
Hosting Scrypted on the Orange Pi 5
When setting up the Scrypted home video platform, it’s important to consider what kind of computer to use as the host. Scrypted benefits from being a pluggable system that can cater to a variety of use cases, so there is flexibility in weighing desired performance and functionality against cost of hardware. NVR, for example, benefits from having fast GPUs and AI accelerators for object detection, as well as ample reliable hard disk storage. Using Scrypted as a hub for many high-resolution cameras benefits from extra RAM and good hardware-accelerated decoders.
To help with navigating the many choices for home servers, Scrypted provides hardware recommendations in its docs. In this tutorial, we explore an alternate option: the Orange Pi 5.
Why the Orange Pi 5?
The Orange Pi 5 is a single-board computer sporting the 8-core ARM64 Rockchip RK3588S processor. What’s special about this CPU is its built-in NPU (neural processing unit) with 3 cores at 2 TOPS each, giving up to 6 TOPS of AI processing power.
| Server | Time to run benchmark (yolov6n) |
|---|---|
| Apple Silicon M1 Ultra | 5 seconds |
| NVIDIA 4090 | 7 seconds |
| Intel 13500H | 11 seconds |
| Orange Pi 5 | 22 seconds |
| Intel N100 | 27 seconds |
Object detection benchmarks with data sourced from Scrypted. Only yolov6n is currently supported by the @scrypted/rknn plugin.
The integrated Rockchip VPU (video processing unit) is capable of hardware acceleration, supporting transcoding up to 1080p@480fps or 4k@120fps using the Rockchip MPP media stack. With RAM configurations up to 16 GB (32 GB soon available), the Orange Pi 5 is a small but capable device for running Scrypted.
NOTE: While Rockchip devices sport decent processing power for their price point, they are more barebones than other home servers like the Intel N100. Setup and maintenance will be more hands-on, with potential for errors when performing live kernel upgrades, so casual users should opt for hardware on the recommendations list with better system software support.
Though this tutorial focuses on the Orange Pi 5, setup for other Rockchip RK3588(S) devices should be similar, with differences in OS installation and setup. Assuming a recent-enough Linux kernel, Scrypted should be able to leverage the NPU and VPU on these other Rockchip boards. It is not recommended to use an Android-based OS for these devices.
Hardware
Required hardware:
- Orange Pi 5 (at least 8 GB RAM)
- Orange Pi 5 USB-C power supply a
- microSD card (at least 8 GB)
- Computer with a microSD card writer (or SD card writer and a microSD-to-SD card adapter)
- Ethernet cable
Recommended hardware:
- Orange Pi 5 enclosure
- NVMe M.2 2242 SSD (at least 256 GB) b
- External HDD (for NVR users, at least 2 TB)
- External HDD enclosure (for NVR users) c
Assembly of the Orange Pi 5 depends on the specific enclosure used. Refer to the manufacturer’s
manual for exact steps.
Setting up the microSD card
On a computer with a microSD card writer, download and install balenaEtcher. We will use it to write an Armbian Linux image to the microSD card.
Navigate to the Armbian Linux Orange Pi 5 page and download a Server/CLI Ubuntu image. Choose any stable build with kernel version 6.1 or above. The rest of this tutorial will use Armbian Linux 6.1 Ubuntu 22.04 Server/CLI.
NOTE: Though not required, it is usually recommended to verify the checksum of the downloaded image. To do so, follow the steps from the Armbian docs.
Plug in the microSD card and launch balenaEtcher. Choose the Armbian Linux image and your microSD card drive. Double check that the drive is correct!
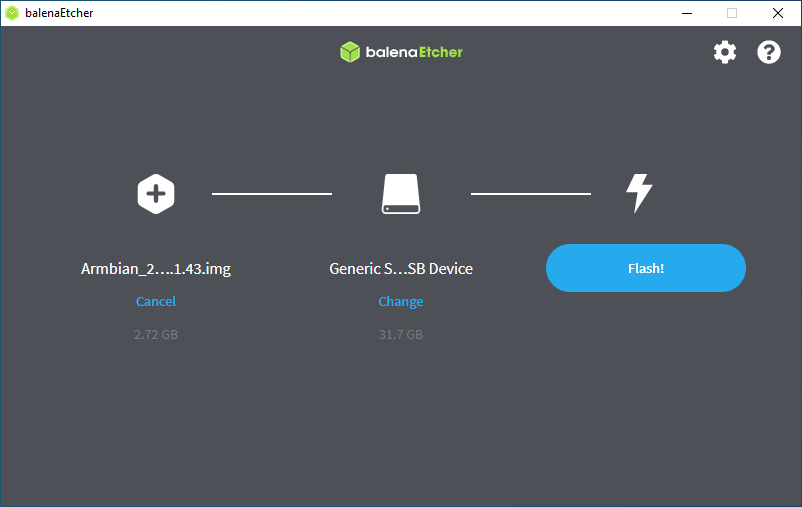
Imaging the microSD card
Click Flash!, wait for it to finish, then eject the microSD card.
Initial boot
Plug in the microSD card into the Orange Pi 5. Connect the Orange Pi 5 to your network router with an Ethernet cable. We will perform setup over SSH, though on-device setup with HDMI and keyboard is also possible.
Power on the Orange Pi 5 to boot from the microSD card. Find its IP address
(most router admin pages will list the IP under the hostname orangepi5)
and SSH in with the username root and password 1234. The initial login
will prompt you to change the root password, create a local non-root
user, and perform additional system setup.
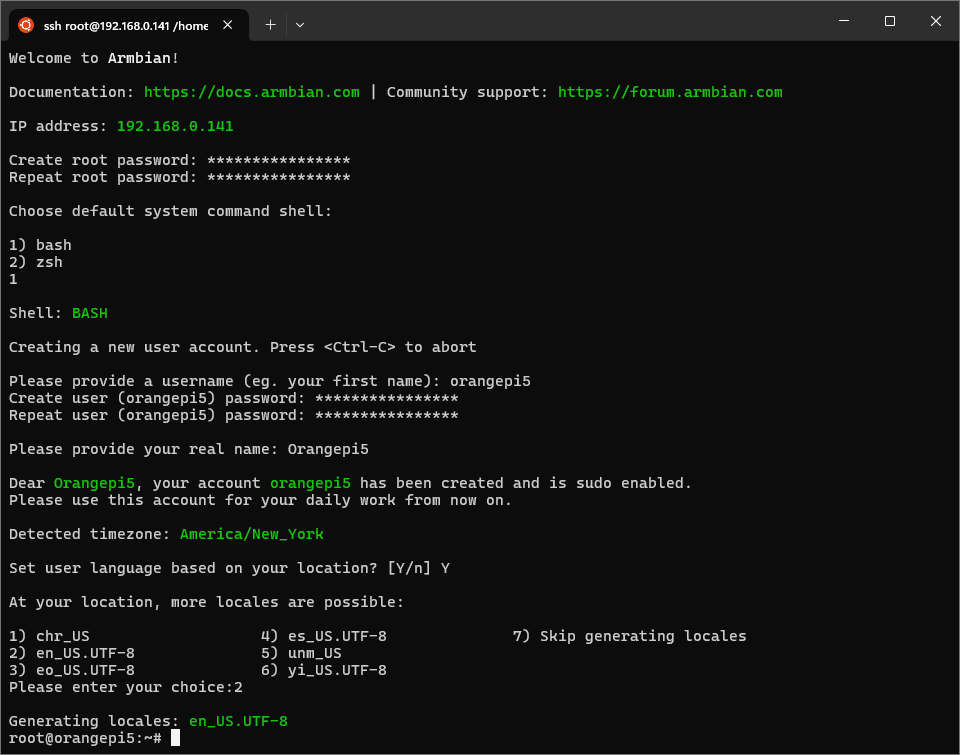
Initial login screen
NOTE: If you made a mistake during the initial login setup or exited out of it early,
run touch /root/.not_logged_in_yet then reboot. The next login will prompt you for
setup once again.
Once setup is complete, update the system by running apt update && apt -y upgrade.
Installing the OS to NVMe
Installing Linux to and booting from NVMe grants greater storage capacity and faster filesystem I/O. We will reformat the NVMe drive then move the OS install stored on the microSD card to NVMe.
In a root shell on the Orange Pi 5, find the NVMe drive with lsblk.

lsblk output
Usually, the NVMe drive will show up as nvme0n1. In the above example, there is an
existing partition, nvme01n1p1. We will delete this and recreate it during
reformatting. Run parted, then peform the following operations:
select /dev/nvme0n1- select the device to operate on (replace with the correct device iflsblkshows a different NVMe drive, but keep the/dev/prefix)mktable gpt- reformats the disk by creating or replacing the partition tablemkpart armbi_root ext4 0% 100%- creates a partition spanning the entire diskquit- exitpartedand commit changes
Fixup the new partition as ext4 by running mkfs.ext4 /dev/nvme0n1p1.
Label the partition with e2label /dev/nvme0n1p1 armbi_root.
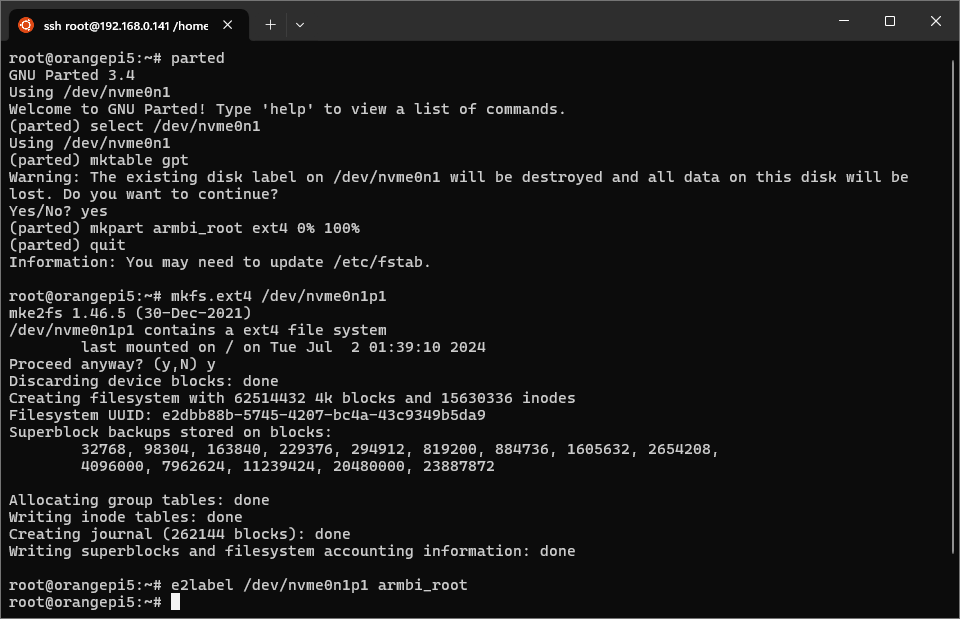
Preparing the NVMe drive with parted, mkfs.ext4, and e2label
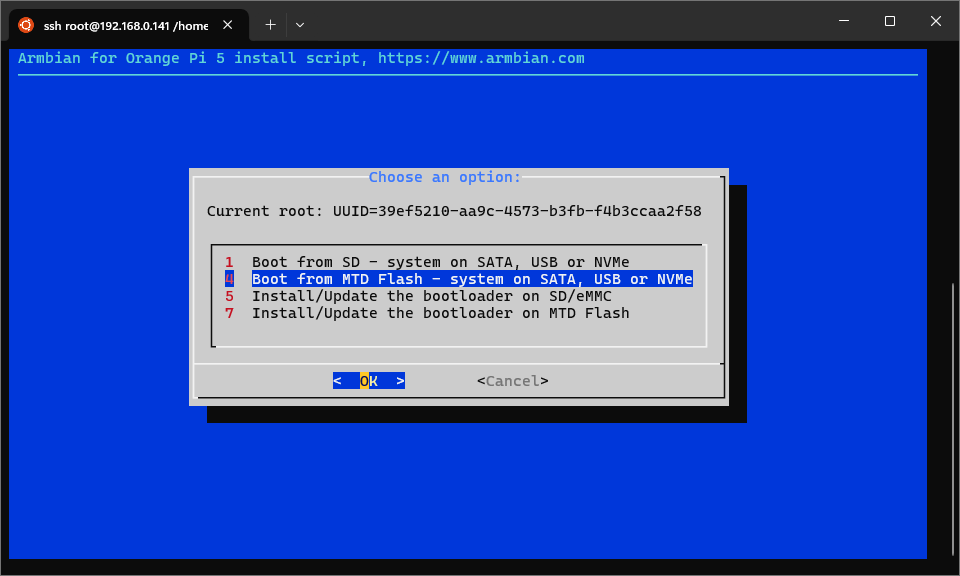
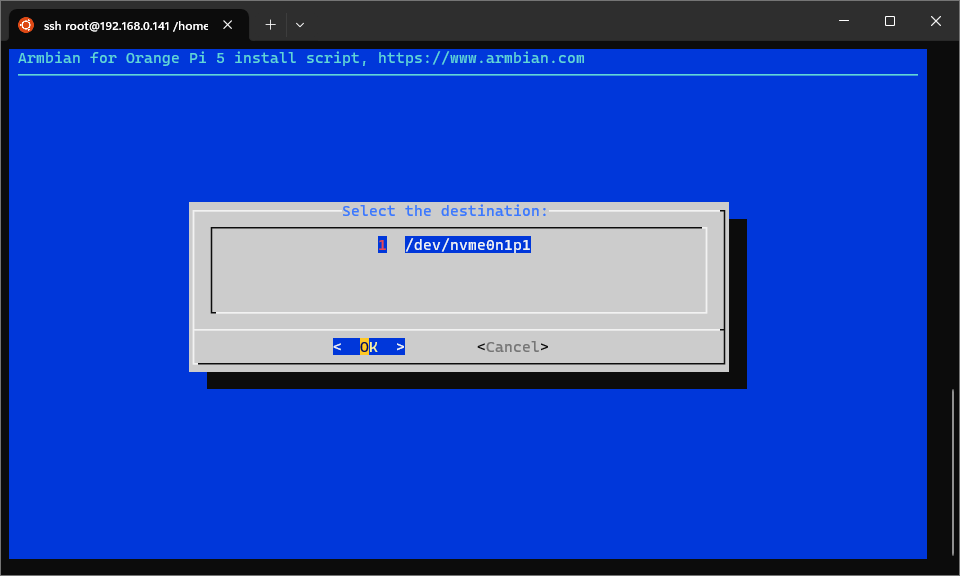
Now, run armbian-install and select option 4. This will copy the OS from
the microSD card onto the new partition on the NVMe drive. When selecting
the target drive, select the NVMe formatted in the steps above. The installer
may ask to reformat the disk - select ext4.
|
|
|
|
Various screens of armbian-install
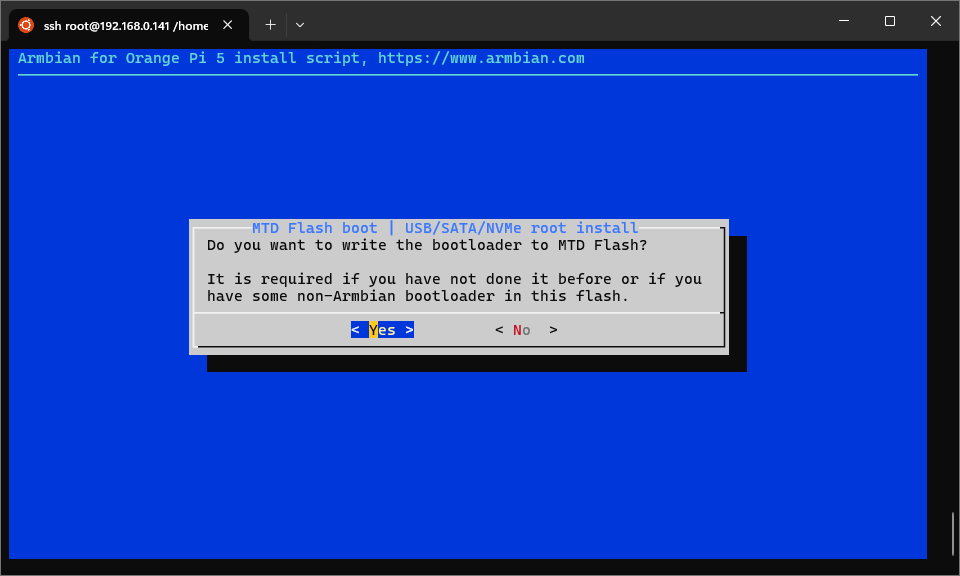
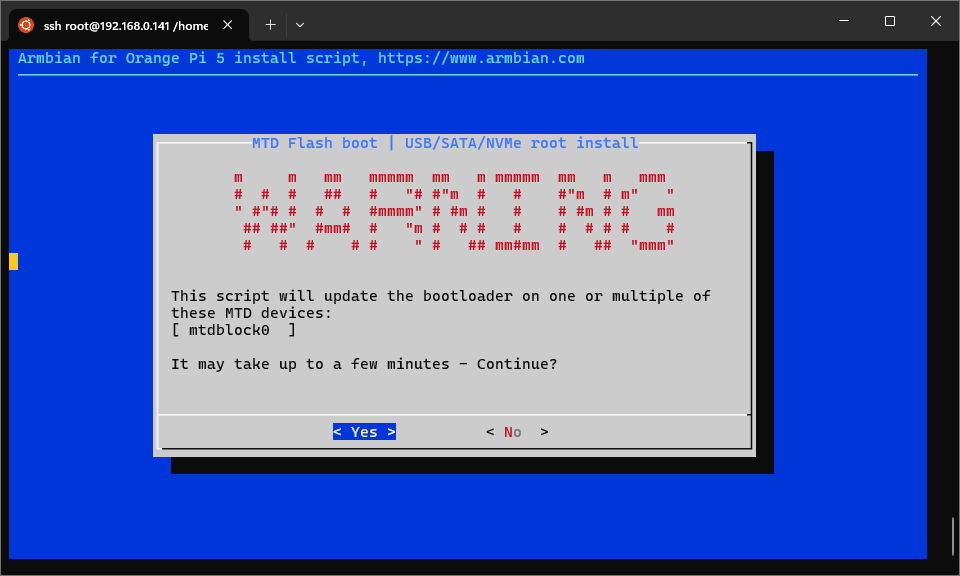
Once OS install completes, ensure the bootloader is also installed. This will
take a rather long time with no visible progress. Once the install completes,
armbian-install will prompt to power off. Select Power off from the installer screen,
or manually run poweroff in the shell.
Remove the microSD card and turn the board back on. It should now boot up from NVMe.
NOTE: The IP address may change after switching the boot disk from microSD to NVMe. Check your router for the new IP if the host is unreachable over SSH.
Installing Scrypted
Log in as the user account created during installation. We will install Scrypted using the official Linux Docker instructions. The install script has been reproduced below (check the docs for the latest edition):
curl -s https://raw.githubusercontent.com/koush/scrypted/main/install/docker/install-scrypted-docker-compose.sh > ~/install-scrypted-docker-compose.sh
sudo SERVICE_USER=$USER bash ~/install-scrypted-docker-compose.sh
rm ~/install-scrypted-docker-compose.sh
When prompted, install Docker and Avahi.
Open up ~/.scrypted/docker-compose.yml and make a few modifications:
- Under
devices, uncomment the line that maps"/dev/dri:/dev/dri". - Under
devices, add the following device mappings:"/dev/dma_heap:/dev/dma_heap","/dev/rga:/dev/rga","/dev/mpp_service:/dev/mpp_service". - Under
security_opt, addsystempaths=unconfined. - For NVR users, under
environment, uncomment the line that sets theSCRYPTED_NVR_VOLUMEenvironment variable. - For NVR users, under
volumes, uncomment the line that mounts the host path/mnt/media/videoto/nvrinside the container.
Check out the docker-compose.yml below as a
reference.
Restart the Docker containers with cd ~/.scrypted && docker compose up --force-recreate -d, or reboot.
Setting up a filesystem mount for NVR
If you are using Scrypted NVR, it is highly recommended to get an external HDD. Now’s the time to plug it in.
If your drive is brand new or recycled from a different computer, chances are that it will need to be reformatted. Skip the following reformatting steps if you are transferring over an existing NVR drive from a different computer.
Similar to NVMe installation, we will use lsblk and parted.
In a root shell on the Orange Pi 5, find the HDD drive with lsblk.

lsblk output
Usually, the HDD drive will show up as sda. In the above example, there is an existing partition, sda1. We will delete this and recreate it during reformatting. Run parted,
then peform the following operations:
select /dev/sda- select the device to operate on (replace with the correct device iflsblkshows a different HDD drive, but keep the/dev/prefix)mktable gpt- reformats the disk by creating or replacing the partition tablemkpart drive ext4 0% 100%- creates a partition spanning the entire diskquit- exitpartedand commit changes
Fixup the new partition as ext4 by running mkfs.ext4 /dev/sda1.
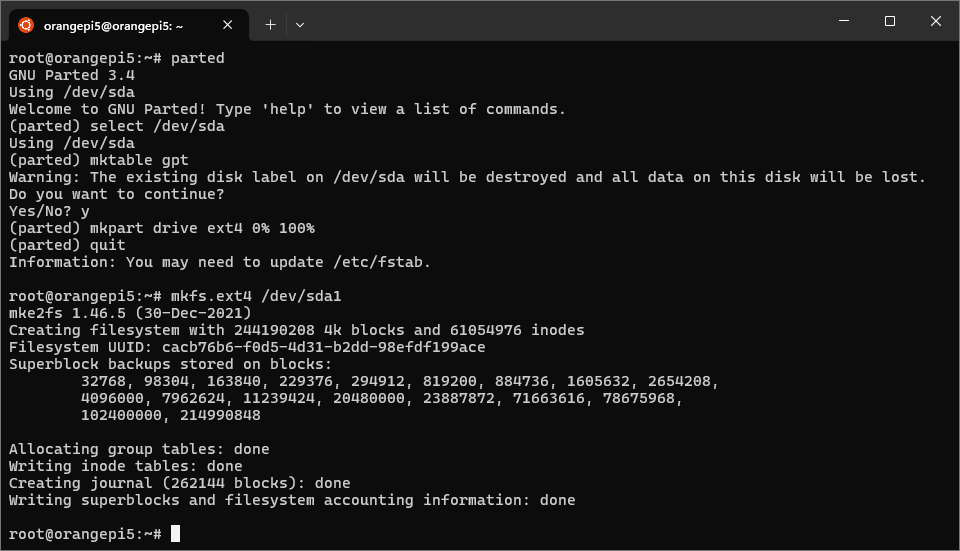
Preparing the HDD drive with parted, mkfs.ext4, and e2label
Now, we need to mount the drive. Find the partition’s UUID with blkid:
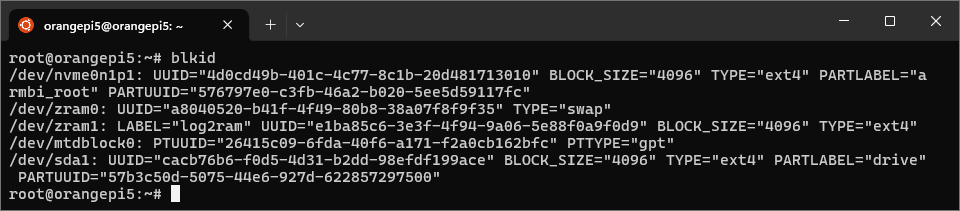
blkid output
For the example above, the UUID of /dev/sda1 is cacb76b6-f0d5-4d31-b2dd-98efdf199ace. Open up /etc/fstab and add a new
line (replace the UUID with yours):
UUID=cacb76b6-f0d5-4d31-b2dd-98efdf199ace /mnt/media/video ext4 defaults,nofail,x-systemd.device-timeout=30 0 0
Reboot, and your drive will be automatically mounted on startup.
Plugin configuration
Navigate to the Scrypted management console at https://<your orange pi 5 ip>:10443.
Ensure that https is used. You may be prompted to accept an insecure connection,
since Scrypted generates its own self-signed certificates for HTTPS. Create the initial
admin user account.
NOTE: For users looking to migrate an existing setup, restore a backup from the Settings section of the sidebar. Once the restore succeeds, log in with the account of the restored backup, not the account created for the fresh Scrypted install.
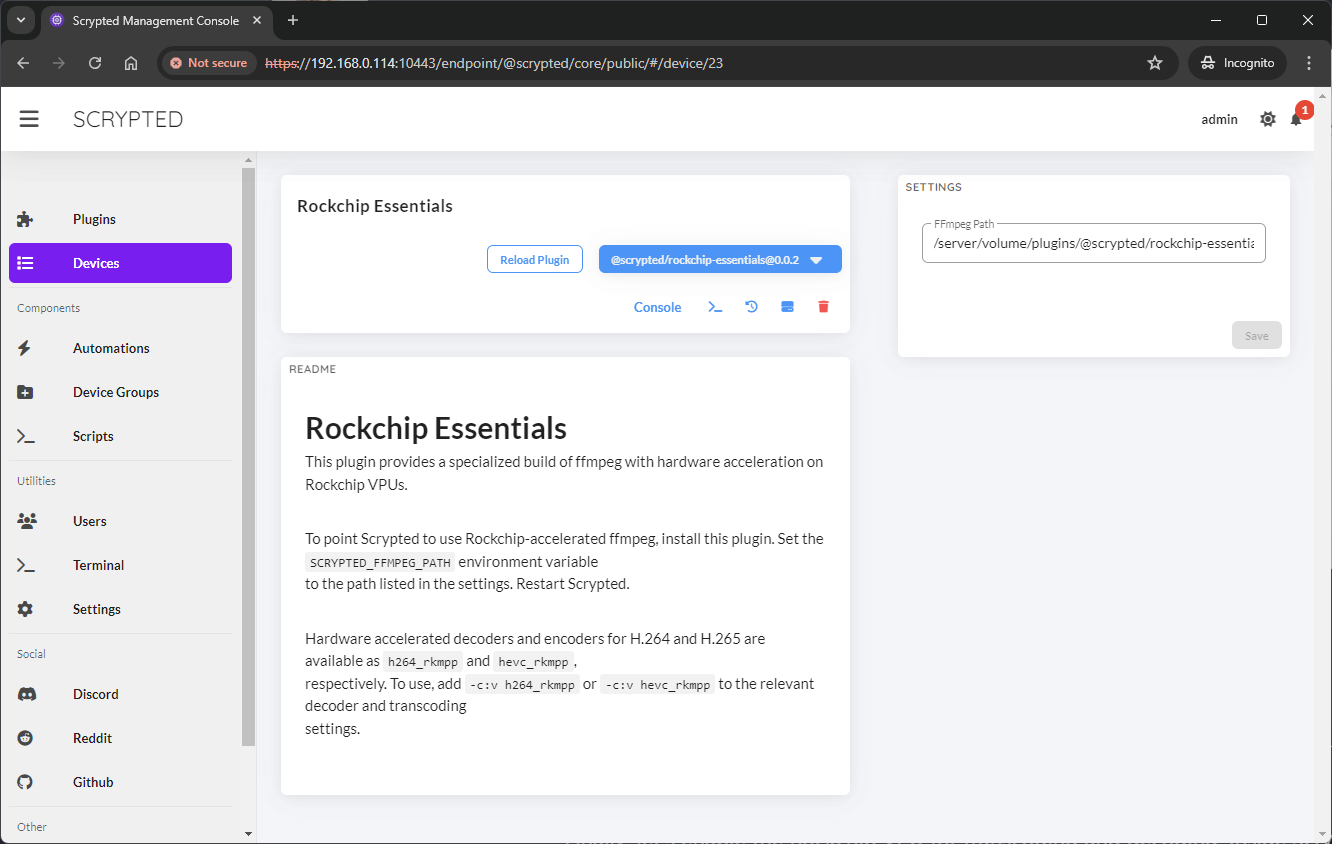
Install the @scrypted/rockchip-essentials plugin.
This plugin will download a special build of FFmpeg that can leverage
the Rockchip VPU for hardware acceleration. The plugin will also
automatically install @scrypted/rknn, which provides object detection
capabilities via the Rockchip NPU.
The @scrypted/rockchip-essentials plugin will show the path, inside the
Scrypted container, that contains the downloaded FFmpeg. Typically, this is
at /server/volume/plugins/@scrypted/rockchip-essentials/files/ffmpeg.
Modify docker-compose.yml to set the environment variable
SCRYPTED_FFMPEG_PATH to this path.
The path to the downloaded FFmpeg is displayed under the plugin settings
The final docker-compose.yml may look something like this:
Click to expand
# The Scrypted docker-compose.yml file typically resides at:
# ~/.scrypted/docker-compose.yml


# Scrypted NVR Storage (Optional Network Volume: Part 1 of 3)
# Example volumes SMB (CIFS) and NFS.
# Uncomment only one.
# volumes:
#     nvr:
#         driver_opts:
#             type: cifs
#             o: username=[username],password=[password],vers=3.0,file_mode=0777,dir_mode=0777
#             device: //[ip-address]/[path-to-directory]
#     nvr:
#         driver_opts:
#             type: "nfs"
#             o: "addr=[ip-address],nolock,soft,rw"
#             device: ":[path-to-directory]"

services:
    scrypted:
        environment:
            # Scrypted NVR Storage (Part 2 of 3)

            # Uncomment the next line to configure the NVR plugin to store recordings
            # use the /nvr directory within the container. This can also be configured
            # within the plugin manually.
            # The drive or network share will ALSO need to be configured in the volumes
            # section below.
            - SCRYPTED_NVR_VOLUME=/nvr

            - SCRYPTED_WEBHOOK_UPDATE_AUTHORIZATION=Bearer f528318087bec447bf0027423fbd364a
            - SCRYPTED_WEBHOOK_UPDATE=http://localhost:10444/v1/update
            - SCRYPTED_FFMPEG_PATH=/server/volume/plugins/@scrypted/rockchip-essentials/files/ffmpeg

            # Avahi can be used for network discovery by passing in the host daemon
            # or running the daemon inside the container. Choose one or the other.
            # Uncomment next line to run avahi-daemon inside the container.
            # See volumes and security_opt section below to use the host daemon.
            # - SCRYPTED_DOCKER_AVAHI=true

            # NVIDIA (Part 1 of 4)
            # - NVIDIA_VISIBLE_DEVICES=all
            # - NVIDIA_DRIVER_CAPABILITIES=all

        # NVIDIA (Part 2 of 4)
        # runtime: nvidia

        # NVIDIA (Part 3 of 4) - Use NVIDIA image, and remove subsequent default image.
        # image: ghcr.io/koush/scrypted:nvidia
        image: ghcr.io/koush/scrypted

        volumes:
            # NVIDIA (Part 4 of 4)
            # - /etc/OpenCL/vendors/nvidia.icd:/etc/OpenCL/vendors/nvidia.icd

            # Scrypted NVR Storage (Part 3 of 3)

            # Modify to add the additional volume for Scrypted NVR.
            # The following example would mount the /mnt/sda/video path on the host
            # to the /nvr path inside the docker container.
            - /mnt/media/video:/nvr

            # Or use a network mount from one of the CIFS/NFS examples at the top of this file.
            # - type: volume
            #   source: nvr
            #   target: /nvr
            #   volume:
            #     nocopy: true

            # Uncomment the following lines to use Avahi daemon from the host.
            # Ensure Avahi is running on the host machine:
            # It can be installed with: sudo apt-get install avahi-daemon
            # This is not compatible with running avahi inside the container (see above).
            # Also, uncomment the lines under security_opt
            - /var/run/dbus:/var/run/dbus
            - /var/run/avahi-daemon/socket:/var/run/avahi-daemon/socket

            # Default volume for the Scrypted database. Typically should not be changed.
            - ~/.scrypted/volume:/server/volume
        # Uncomment the following lines to use Avahi daemon from the host
        # Without this, AppArmor will block the container's attempt to talk to Avahi via dbus
        security_opt:
            - apparmor:unconfined
            - systempaths=unconfined
        devices: [
            # uncomment the common systems devices to pass
            # them through to docker.

            # all usb devices, such as coral tpu
            # "/dev/bus/usb:/dev/bus/usb",

            # hardware accelerated video decoding, opencl, etc.
            "/dev/dri:/dev/dri",
            "/dev/dma_heap:/dev/dma_heap",
            "/dev/rga:/dev/rga",
            "/dev/mpp_service:/dev/mpp_service",

            # uncomment below as necessary.
            # zwave usb serial device

            # "/dev/ttyACM0:/dev/ttyACM0",

            # coral PCI devices
            # "/dev/apex_0:/dev/apex_0",
            # "/dev/apex_1:/dev/apex_1",
        ]

        container_name: scrypted
        restart: unless-stopped
        network_mode: host

        # logging is noisy and will unnecessarily wear on flash storage.
        # scrypted has per device in memory logging that is preferred.
        # enable the log file if enhanced debugging is necessary.
        logging:
            driver: "none"
            # driver: "json-file"
            # options:
            #     max-size: "10m"
            #     max-file: "10"
        labels:
            - "com.centurylinklabs.watchtower.scope=scrypted"

    # watchtower manages updates for Scrypted.
    watchtower:
        environment:
            - WATCHTOWER_HTTP_API_TOKEN=f528318087bec447bf0027423fbd364a
            - WATCHTOWER_HTTP_API_UPDATE=true
            - WATCHTOWER_SCOPE=scrypted
            # remove the following line to never allow docker to auto update.
            # this is not recommended.
            - WATCHTOWER_HTTP_API_PERIODIC_POLLS=true
        image: containrrr/watchtower
        container_name: scrypted-watchtower
        restart: unless-stopped
        volumes:
            - /var/run/docker.sock:/var/run/docker.sock
        labels:
            - "com.centurylinklabs.watchtower.scope=scrypted"
        ports:
            # The auto update port 10444 can be configured
            # Must match the port in the auto update url above.
            - 10444:8080
        # check for updates once an hour (interval is in seconds)
        command: --interval 3600 --cleanup --scope scrypted
Restart the Docker containers with cd ~/.scrypted && docker compose up --force-recreate -d, or reboot.
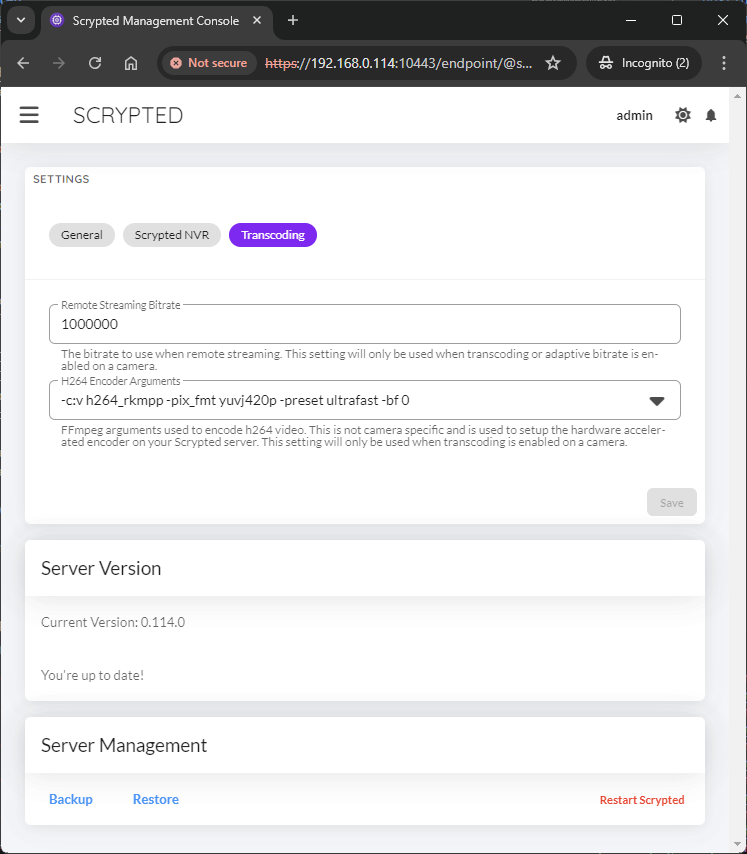
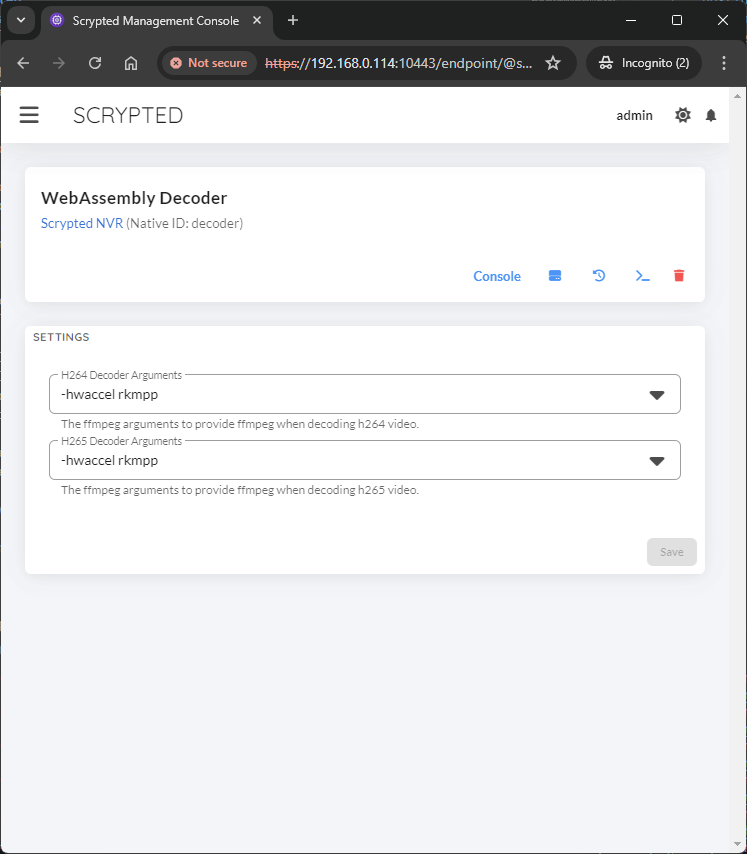
Finally, let’s enable the Rockchip VPU for transcoding
and decoding. Install the @scrypted/prebuffer-mixin plugin.
Inside Scrypted, under the Settings option
on the sidebar, modify the H264 Encoder Arguments and replace libx264 with h264_rkmpp. For
NVR users, under the WebAssembly Decoder device,
set both H264 Decoder Arguments and H265 Decoder Arguments to -hwaccel rkmpp.
|
|
Enabling hardware acceleration
Final setup and verification
At this point, Scrypted is fully installed and configured.
Using a custom tool, rknputop, we can
monitor NPU usage.
To install rknputop, open a root shell on the Orange Pi 5 and run:
apt install python3-pip
python3 -m pip install plotext psutil
wget https://raw.githubusercontent.com/ramonbroox/rknputop/main/rknputop
chmod +x rknputop
chmod 755 rknputop
mv rknputop /usr/local/bin/
rknputop must be run as root to read NPU data.
To test, go back into Scrypted and create a new Script from the sidebar. Copy the below detection benchmark (adapted from the Scrypted scripts site):
Click to expand
const mo = await mediaManager.createMediaObjectFromUrl('https://user-images.githubusercontent.com/73924/230690188-7a25983a-0630-44e9-9e2d-b4ac150f1524.jpg');
const image = await mediaManager.convertMediaObject<Image & MediaObject>(mo, 'x-scrypted/x-scrypted-image');

const detectors = [
    // '@scrypted/coreml',
    // '@scrypted/onnx',
    // '@scrypted/openvino',
    // '@scrypted/tensorflow-lite',
    '@scrypted/rknn',
];

const simulatedCameras = 4;
const batch = 4;
const batchesPerCamera = 125;

for (const id of detectors) {
    const d: ObjectDetection = systemManager.getDeviceById<ObjectDetection>(id);
    console.log('starting', id);
    // await d.detectObjects(image);

    const model = await d.getDetectionModel();
    const bytes = await image.toBuffer({
        resize: {
            width: model.inputSize[0],
            height: model.inputSize[1],
        },
        format: model.inputFormat,
    });

    // cache a preconverted image to remove that from benchmark.
    const media: Image & MediaObject = await sdk.mediaManager.createMediaObject(bytes, 'x-scrypted/x-scrypted-image', {
        sourceId: image.sourceId,
        width: model.inputSize[0],
        height: model.inputSize[1],
        format: null,
        toBuffer: async (options: ImageOptions) => bytes,
        toImage: undefined,
        close: () => image.close(),
    })

    const start = Date.now();

    let detections = 0;
    const simulateCameraDetections = async () => {
        for (let i = 0; i < batchesPerCamera; i++) {
            await Promise.all([
                d.detectObjects(media, { batch }),
                d.detectObjects(media),
                d.detectObjects(media),
                d.detectObjects(media),
            ]);
            detections += batch;
        }
    };

    const simulated: Promise<void>[] = [];
    for (let i = 0; i < simulatedCameras; i++) {
        simulated.push(simulateCameraDetections());
    }

    await Promise.all(simulated);

    const end = Date.now();
    const ms = end - start;
    console.log(id, 'done', ms, 'ms', detections, 'detections', detections / (ms / 1000), 'detections per second');
}
In a shell window, run sudo rknputop. In a Scrypted window, run the script. You should see
the NPU usage increase as the detection benchmark runs.
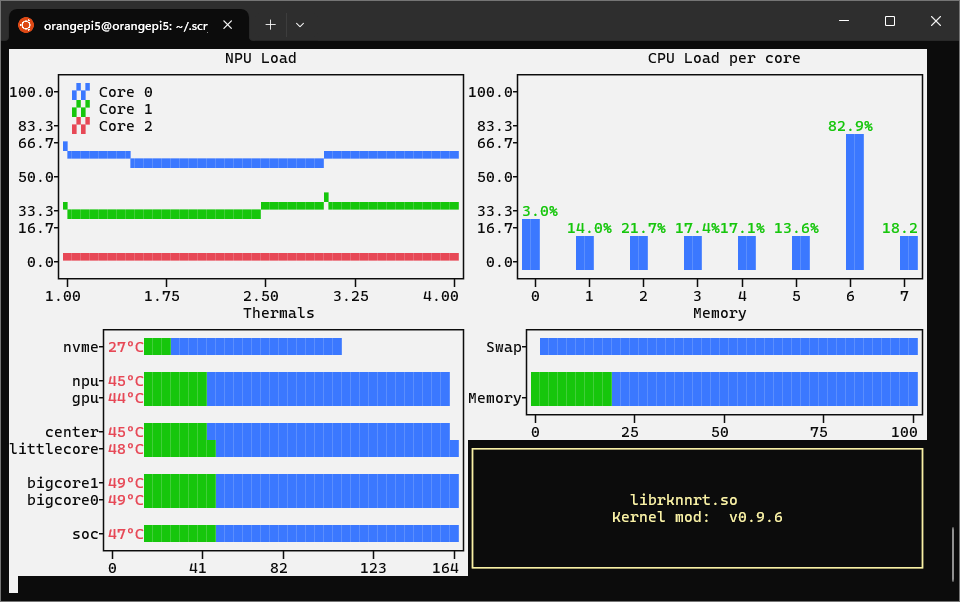
rknputop output during object detection
NOTE: Due to driver limitations, the maximum reported NPU usage is capped at around 60-70%. The object detection benchmark script does not usually cause the NPU to reach this maximum utilization.
Conclusion
The Orange Pi 5 is a small but capable device, with specialized hardware to accelerate two of the most compute-intensive tasks used by Scrypted: object detection and video decoding. Depending on your needs, it may be a suitable upgrade from a Raspberry Pi or old Intel PC.